How to Clean a Box Fan Most Effectively
Why do I need to clean my box fan? How often should I clean a box fan? How to clean my box fan without hiring a professional?
If you are looking for the answer to these questions then you are in the right place.
A box fan used to regulate the temperature in the house, removes odors, dust, and other unwanted substances like smoke, in addition to causing stagnant air to circulate and be less noticeable.
Though it’s a very essential appliance of our home, we do not tend to invest the time and money needed to maintain it. Most people after one or two seasons, simply dump their box fan because the blade speed has reduced by half (and this is because of gunk) or it is producing much more noise while running and probably using more electricity to boot.
That isn’t necessary however, instead we recommend cleaning your box fan. If you can clean it regularly, it will serve you for years, instead of having to replace your box fan every season.
Our expert will educate you about cleaning a box fan to help bring your box fan back to life and make it last through the years while saving you money and headache along the way.
So Why Do You Need To Clean Box Fan?
Cleaning a box fan may not be everyone’s cup of tea but it does have sure benefits. However, if you decide that it is not for you and you would rather pick up a new one be sure to check out our post on the best box fans to make sure you get the right one for your needs.
- Increase the efficiency of the fan.
- Increase your box fan lifetime and durability.
- After cleaning, the box fan blows air like you bought a brand new fan.
- After a good cleaning of a box fan, it will start blowing clean and fresh air since there is no dust and dirt in fan blades and cover.
- It’s a good practice to clean the box fan after using it in summer and store it properly in winter.
Step by Step Guideline: How To Clean Box Fan
In the video below we will show you How you can clean a standing box fan
What You May Need for This Cleaning Job?
You will require the following materials to do a good job:
- A bowl containing water and white vinegar in equal measure or a cleaning agent of your choice
- Screwdriver
- Dusting brush
- Scrubby pad
- Q-tip
- Soft cloths, 2 of them or paper towels
Procedure for Cleaning a Box Fan:
Step 1: Unplug the box fan.
Unplug the power cord of the box fan that is connected to the power outlet. We don’t want a “shocking” surprise. After that, take it to a table or surface which is at your waist height for comfort, depending on how dirty your fan is this can take some time. Always cover the surface or table with some newspaper or something similar to protect it from dirt and dust.
Step 2: Remove Outer Covers
Unscrew the tiny screws that hold the plastic covers. Ensure that both the front and back covers are removed. Do keep the screws somewhere safe so that they aren’t misplaced, as they tend to be a very small size. A Titan mini magnetic parts tray from amazon is our personal choice and highly recommended for pretty much all projects involving screws and other small metal parts.
Step 3: Clean the Covers
After taking the covers off from the fan body, next you need to clean it.
You can choose any of these three methods to clean the cover of the fan.
- a) Bathtub: Gather some water in your bathtub. and put some detergent in it and mix it in the water. After that, soak both the front and back cover in water solution. After soaking them for some time, you will then rinse the covers with clean water. The dirt will be washed off.
- b) Hose: Douse the covers with some vinegar or your preferred cleaner first and wait for a few minutes. Thereafter, use your hose to spray high-pressure water in the covers for cleaning the dust and dirt.
- c) By Hand: Spray the covers with the vinegar and water mixture, after which you will need to wipe them using a soft cloth or paper towel. Ensure that the small holes are not left out. The corner of the cloth, paper towel or q-tip will help in reaching these parts. The kitchen sink is useful when rinsing the covers but a lot of water will spill out unless you are skillful at this.
Step 4: Clean the blades
Spray the vinegar and water mixture or cleaning agent onto a clean cloth. You can reuse clothes that use to clean box fan cover after rinsing it and wringing out the excess water, wipe the blades with the cloth multiple times until the blades are completely cleaned.
Sometimes the build up in the blades is too stubborn to yield to the gentle cleaning process. At that time, you can use a scrubby pad instead of a normal cloth for cleaning.
If the blades didn’t clean by using the method we discussed, you can use the next method which will work without any doubt.
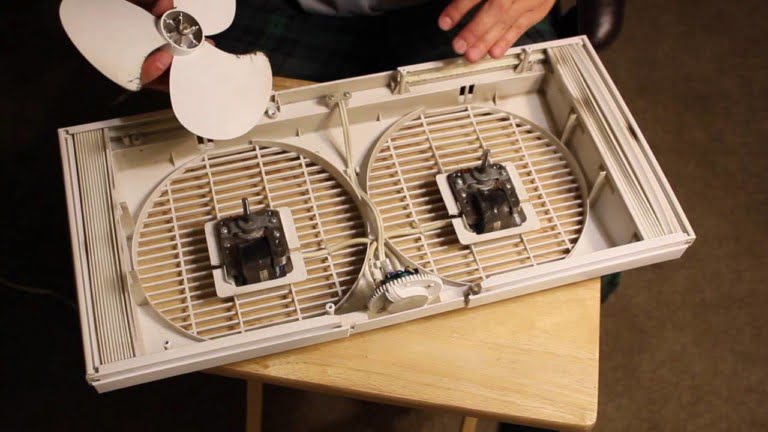
First, completely disassemble the blades from fans body. Then, soak the blades in mildly hot water for a few minutes. After that, clean the fan blades we discussed earlier.
Note: Remember that not all fans can be disassembled fully and able to clean every part separately.
Don’t forget to clean the carry handle, power cords, and knobs if your box fan has any. Dirt and dust will also build on them too. You can clean it using a damp cloth. While most times these won’t affect the performance of the box fan, it will help with usability and of course, it will LOOK better to have a clean box fan inside and out.
Step 5: Brush the Motor
Use a dust brush to remove the dirt that is gathered in the motor. Make sure that the struts are also well wiped. Dirt on the motor gives the impression that the motor is worn out and irreparable. Yet cleaning it well services it adequately to function very nicely. Most times bringing it fully back to life and increasing the life span of your box fan.
Step 6: Reassemble the box fan
Make sure that the parts have dried well before reassembling them. Put back the covers and blades in their rightful position before screwing them firmly. If you have fewer screws, then at least ensure that the top and bottom of the fan are screwed(or use the magnetic tray so you don’t lose any). Give priority to these two sides since the sides of the fan can be left open without repercussions. However, this should be a temporary arrangement and so consider replacing the lost screws as soon as possible. Note that some screws may no longer fit in the expanded holes and will require replacements for a firm fitting.
Warning & Precautions:
- Do not spray directly on the blades while cleaning them as the mixture containing detergents and dirt can splash back onto your face and cause injury.
- Ensure that none of the box fan parts are loose as this can cause disturbing levels of noise and no one wants to see fan parts flying all over the room.
- Replace cracked blades. Most blades are made of plastic and these cannot be repaired.
- You can wear goggles when spraying the covers to protect your eyes.
- The fan should always be unplugged before it is cleaned or assessed otherwise it poses the risk of causing an electric shock.
- Running fans should not be left unattended while children or pets are nearby.
- Do not let water in the motor or spray it with ANY cleaner. These cleaners contain water which causes the motor to rust and eventually it will get spoiled.
Wrap It Up
So now you have learned how you can clean a box fan most effectively. Now, it’s your time to clean your box fan for the first time.
We suggest you clean a box fan before you going to store it in winter. Once you have cleaned it properly, store the fan in a place where it will not be exposed to dust again. You can keep it in a bag or a plastic garbage bag and seal it well.
Reference: